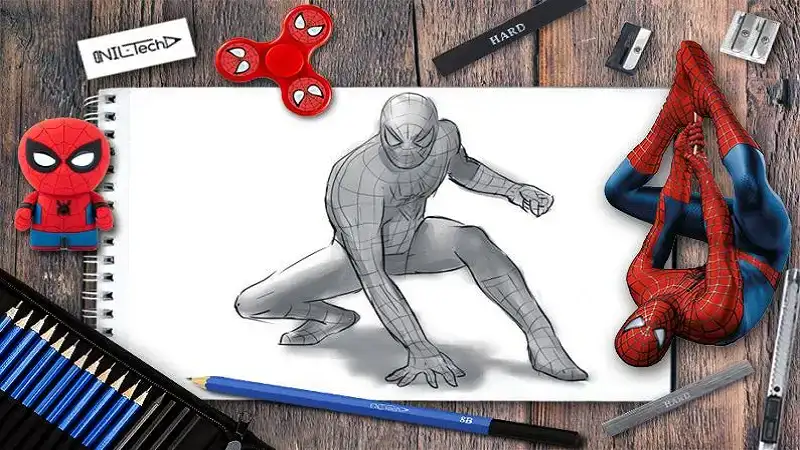
Art has always been a powerful means of self-expression, and drawing is one of the most accessible forms of it. When it comes to drawing superheroes, few characters are as universally recognized and beloved as Spider-Man. His dynamic poses, striking costume, and agile figure make him a popular subject for both new and seasoned artists. If you’ve ever wanted to capture the web-slinging hero in your artwork, this guide will walk you through creating the drawing:cuyvl6drpxk= spider man step by step.
This tutorial will cover everything from understanding Spider-Man’s anatomy to mastering the details of his iconic costume. By the end, you’ll have a complete understanding of how to approach drawing Spider-Man, whether you’re working with pencil and paper or a digital tablet.
The Importance of Spider-Man Anatomy in Drawing
Before diving into the technical steps of drawing, it’s crucial to understand Spider-Man’s anatomy. Unlike other superheroes, Spider-Man is known for his lean, flexible build. He is muscular but not overly bulky, which allows him to perform acrobatic feats and move with agility. The key is to balance his muscular structure with fluidity and motion in the pose.
Spider-Man’s proportions are relatively human, but his poses often push the limits of what a normal human body can do. His limbs are often exaggerated in length and stretch to emphasize motion, making him appear more dynamic. Capturing this sense of agility and movement is essential when doing the drawing:cuyvl6drpxk= spider man.
Defining Spider-Man Signature Look
Spider-Man’s appearance is instantly recognizable thanks to several key features:
The Iconic Mask
Spider-Man’s mask is one of the most important aspects to get right when drawing him. It covers his entire face, leaving no visible nose, mouth, or ears. The large white eyes outlined in black dominate the mask, giving Spider-Man an almost alien-like look. These eyes are expressive, despite the lack of other facial features, and play a significant role in conveying emotion.
The Webbed Costume
The webbing design on Spider-Man’s suit is another integral part of his look. This intricate pattern covers the red sections of his suit, particularly around the mask, chest, and arms. The blue areas of the suit are typically left plain, allowing the red and webbing to stand out more.
The Spider Symbol
At the center of Spider-Man’s chest lies his signature black spider symbol. This small but striking emblem is another focal point when drawing him and should be proportional to his torso.
Preparing Your Drawing Tools
Before beginning your drawing= Spider-Man, it’s important to have the right tools ready. Whether you’re drawing traditionally or digitally, using the right materials will make the process smoother and more enjoyable.
Traditional Drawing Tools
If you prefer the classic pencil and paper method, here’s a list of essential supplies:
- Pencils: Use a range of pencils, from harder ones (HB) for light sketching to softer ones (2B, 4B) for shading.
- Eraser: A good eraser is essential for refining your work and cleaning up any mistakes.
- Fine-tip Pens: Once your pencil sketch is complete, use fine-tip pens or markers for inking.
- Ruler: This is particularly useful for ensuring straight lines, especially when drawing the webbing on Spider-Man’s suit.
Digital Drawing Tools
For those working digitally, a drawing tablet or iPad with a stylus will be your main tools. Digital art programs like Procreate, Adobe Photoshop, or Clip Studio Paint offer a variety of brushes and tools to make your Spider-Man drawing more polished.
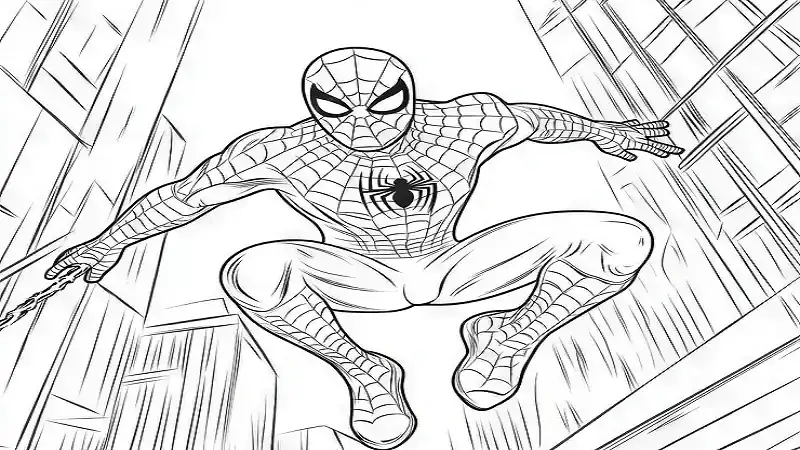
Sketching the Basic Outline
When starting your drawing:cuyvl6drpxk= spider man, it’s essential to begin with a rough sketch that outlines his pose and proportions. Spider-Man is often depicted in dynamic, action-packed poses, which can make drawing him both fun and challenging.
Drawing the Head and Torso
Start by sketching a circle for the head and an oval for the torso. These basic shapes will help guide the rest of the figure. Spider-Man’s head is slightly larger in proportion to his body than a typical human head, which gives him a more youthful appearance.
Sketching the Limbs
Spider-Man’s limbs are long and flexible, allowing him to swing through the city with ease. Use simple lines to mark out where his arms and legs will be, keeping in mind the flow of movement. If he’s in a crouching or swinging pose, make sure the limbs follow natural curves that convey motion.
Refining the Anatomy
Once you’ve sketched out the basic outline, it’s time to add more detail to the body. Spider-Man’s physique should be muscular but lean, with defined abs, arms, and legs.
Defining the Muscles
Since Spider-Man’s body is toned but not overly muscular, focus on refining the muscles without making him look bulky. His legs and arms should have definition, particularly around the thighs, calves, biceps, and forearms, but they should still appear agile and ready for movement.
Refining the Pose
At this stage, take a step back and analyze the pose. Is it dynamic? Does it convey the agility Spider-Man is known for? If not, make adjustments by altering the angle of the limbs or adding more motion to the figure.
Adding Costume Details
Spider-Man’s costume is one of the most recognizable superhero outfits, and getting the details right is key to achieving an authentic drawing.
Sketching the Spider Symbol
The black spider emblem on Spider-Man’s chest should be drawn symmetrically and in proportion to the rest of his torso. It sits right in the middle of his chest, with its legs stretching out towards his shoulders and abdomen.
Drawing the Web Pattern
One of the trickiest parts of drawing Spider-Man is capturing the web pattern on his red sections of the suit. Start by lightly sketching out a grid of lines across his mask, chest, and arms, then draw over these lines to form the webbing. The pattern should be consistent and evenly spaced, with the webs radiating outward from a central point.
Inking the Drawing
Once you’ve finished sketching the details of your drawing:cuyvl6drpxk= spider man, it’s time to ink your work. Inking will give your drawing a bold, finished look.
Outlining the Figure
Use a fine-tip pen or inking brush to carefully outline the body, costume details, and facial features. Be especially careful around the eyes and mask, as these are focal points of the character.
Inking the Webbing
Inking the web pattern can be tricky, but it’s also one of the most rewarding parts of the process. Use a ruler or a steady hand to ensure the lines are straight and evenly spaced. Don’t rush this step—taking your time will result in a cleaner, more polished final product.
Adding Shading and Depth
Shading is essential to give your Spider-Man drawing dimension and realism. The light source in your drawing will determine where shadows fall, so be mindful of where the light is coming from.
Shading the Muscles
Add shading to Spider-Man’s muscles to give them depth. Focus on areas like his abs, biceps, and legs, where shadows naturally fall. Use a soft pencil or digital shading brush for subtle shading that enhances the figure without overpowering it.
Creating Texture with the Webbing
To make the webbing pop, consider adding small shadows or highlights around the web lines. This will give the suit a more three-dimensional look.
Optional: Coloring Your Drawing
While some artists prefer to leave their drawings in black and white, adding color to your drawing:cuyvl6drpxk= spider man can make it stand out even more.
Choosing the Right Colors
Spider-Man’s suit is primarily red and blue, with black accents for the webbing and symbol. Use bold, saturated colors to replicate the vibrant look of the classic costume. Be sure to color the areas around the eyes and chest symbol carefully, as these are key parts of Spider-Man’s design.
Final Adjustments and Touches
As you finish up your drawing:cuyvl6drpxk= spider man take a step back and look for any areas that need tweaking.
Refining the Lines
Go over any lines that seem too faint or uneven, ensuring that the drawing is clean and professional. Double-check the symmetry of the eyes and the spider symbol, as these are often focal points in a Spider-Man drawing.
Adding Final Details
If you want to add some extra flair to your drawing, consider including a background element, such as city buildings or a web-swinging action shot. These small additions can make your Spider-Man drawing look even more dynamic.
Conclusion
Drawing Spider-Man may seem challenging at first, but with patience and practice, you’ll be able to master it. The key to success is breaking the process down into manageable steps, focusing on the details, and staying patient with yourself. Whether you’re working with traditional tools or digital software, the drawing:cuyvl6drpxk= spider man will help you improve your skills and take your art to the next level. Read More beautydod.
FAQs
1.How long does it take to draw Spider-Man?
Depending on your skill level and the level of detail, drawing Spider-Man can take anywhere from a few hours to a full day.
2.Can beginners draw Spider-Man?
Absolutely! While some details can be challenging, with practice and patience, even beginners can create a great Spider-Man drawing.
3.What the best way to improve my Spider-Man drawings?
The best way to improve is through consistent practice and studying reference images. Focus on Spider-Man’s anatomy and dynamic poses.
4.Should I draw Spider-Man digitally or traditionally?
It’s entirely up to your preference! Both methods have their pros and cons. Traditional drawing gives a hands-on feel, while digital drawing offers more flexibility with undo options and layering.
5.Do I have to follow Spider-Man traditional design?
Not at all! Feel free to get creative with Spider-Man’s design, whether it’s changing his costume or experimenting with different poses.